‘Gigantic’ – Hiking Jotunheimen with a tent
Updated on
- Jotunheimen trekking: The main information at a glance
- Jotunheimen trekking gear recommendations
- Six days with a tent – our Jotunheimen trekking trip
- Jotunheimen Trekking Stage 1: From Gjendebu into the mountains
- Stage 2: Heading for the Spiterstulen hut via Leirvassbu
- Stage 3: Winter conditions on Norway’s highest mountain
- Stage 4: Climbing the Glittertind
- Stage 5: A refreshing dip
- Stage 6: The famous Besseggen ridge
Jotunheimen (translation: ‘Home of the giants’) is Norway’s most popular national park. So is it busy? Not at all. We present a week-long Jotunheimen hike for self-supported trekkers with all the main highlights.
Emerald green lakes and steep valleys, gushing mountain streams and wide glaciers, Norway’s highest summits and the most spectacular ridge in all Scandinavia. Jotunheimen National Park is one of the top spots for hiking in Norway. How to best combine the region’s most beautiful spots with its most spectacular views?
This was the question my friend Jan and I asked ourselves before setting off on our trekking trip. It quickly became clear that we would have to choose between Jotunheimen’s many hiking routes.
As we only had seven days, we could either go for the eastern part of the national park with its well-known Besseggen Ridge or the western part, which borders on Utladalen, Norway’s deepest valley with the 273-metre Vettisfossen waterfall. There’s just no way to fit in both, after all the Jotunheimen mountain wilderness is something like four times the size of Amsterdam. And as mere humans, we only have normal strides, not giant ones.
We opt for a classic route through the eastern side of Jotunheimen, right in the touristic heart of the national park. This is where you find the emerald green Lake Gjende with its ferry crossings and Norway’s two highest mountains: Galdhøpiggen and Glittertind.
Jotunheimen trekking: The main information at a glance
- How to get there: In summer express buses run from Oslo to Gjendesheim (and on to Lom and Leirvassbu). It’s worth booking your ferry ticket for Lake Gjende online in advance.
- Allemannsretten: The right to roam or ‘everyman’s right’ (Norwegian: Allemannsretten) allows public access to wild camp and stay overnight and in natural and wilderness areas, as long as the land is uninhabited and uncultivated. Although you should keep at least 150 metres away from the nearest inhabited house, hut or cottage. In Jotunheimen itself, and in the Spiterstulen area, the rule is slightly different. You must either pay to camp on the campsite or camp further away. Camp fires are not allowed from between 15 April to 15 September. And obviously, it goes without saying that you take your rubbish with you.
- Which map to use: The best and most detailed Jotunheimen hiking map is published by Swedish publisher Calazo (1:50.000). It’s key is also in English. It’s available at the Gjendesheim ferry terminal kiosk, though you might prefer to buy one in advance online in this German online shop.
Jotunheimen trekking gear recommendations
-
Open textbox to see the Jotunheimen packing list
These recommendations are based on an approximately five-day summer trekking trip with a tent in the Jotunheimen national park.
Footwear and clothing:
- Waterproof, sturdy yet lightweight trekking boots, such as the HANWAG Makra Trek GTX or HANWAG Nazcat GTX.
- Optional: lightweight shoes or sandals to wear in the tent or use in the huts.
- 2 pairs of medium-warm and fast drying trekking socks, such as the HANWAG Trek Merino Sock.
- Medium-warm, water-repellent trekking pants, such as the Fjällräven Keb Trousers.
- Long underwear, such as the Fjällräven Bergtagen Thin Wool Long Johns (you can also sleep in them).
- 2-3 pairs of underpants made from functional fabrics (tip: think merino wool).
- Waterproof overtrousers, such as the Tierra Back Up Hybrid Pant.
- 2 functional baselayers with high merino wool content, such as the Fjällräven Abisko Wool LS. The second shirt is a spare layer, and can also be worn to sleep in.
- 1 warm, but breathable fleece mid layer, such as the Tierra Templet Midlayer Jacket.
- A lightweight, warm jacket with a synthetic fibre fill to wear as your outer layer or under your waterproof jacket, for example the Fjällräven Expedition X-Lätt Jacket.
- A waterproof, breathable hardshell jacket, such as the Fjällräven Keb Eco-Shell Jacket.
- 1 warm, but breathable hat.
- A cap or headband, depending on your personal preference.
- 1 neck gaiter (covers a range of uses, including keeping your neck or head warm).
- 1 pair lightweight fleece or softshell gloves, 1 pair of backup waterproof gloves.
Backpack:
- Trekking backpack with a volume of 65 to 75 litres, such as the Fjällräven Kaijka.
Sleeping arrangements:
- A lightweight, sturdy trekking tent, such as the 2-person Fjällräven Abisko Dome 2. A dome tent will be easier to pitch on the stony ground of Jotunheimen than a tunnel tent. And don’t forget your repair set to patch up the flysheet or repair a pole in an emergency.
- It might also be worth considering packing extra strong tent pegs.
- A lightweight trekking sleeping mat, such as the Frilufts Elphin Air AS.
- Medium-warm to warm trekking sleeping bag with a synthetic fibre fill. A model such as the Fjällräven Abisko Three Seasons should be up to the job. If you particularly feel the cold, then choose a sleeping bag with a comfort temperature (T Comf) down to -5 °C.
Cooking gear:
- A lightweight multi-fuel camping stove, such as the Primus Omnifuel Stove.
- A lightweight and packable set of pots, for example Primus PrimeTech Pot Set 1.3L.
As you will have to carry everything on your back, the less you bring and the lighter your gear, the better. For further tips, see our Pack list for a 5-day trekking trip.
Six days with a tent – our Jotunheimen trekking trip
Hiking in Norway at its very best: The national park is easy to reach, and popular in summer. However, you’ll often find yourself on your own in quiet, secluded locations – especially on rainy days, of which there can be many. This is particularly the case if you are camping in a tent and only using the many huts to warm up from time to time. For experienced and weatherproof self-supported trekkers, Jotunheimen offers an often remote, isolated and mystical trip that almost feels like a high alpine tour – with the welcome option of stopping into one of the mountain huts for a coffee or a beer.
The Gjendesheim Mountain Lodge on Lake Gjende is a great starting point for a one-week round trek. You can reach it by bus, or there is a nearby car park. If you plan to head out from here, there is one thing you’ll want to decide in advance. Will you hike the Besseggen Ridge at the start or the end of your hike? Our recommendation is to leave it to the end, that way you’ll be better prepared for the ridge, which can be steep and challenging in places. This also makes sense and is safer if you’re planning to carry a heavy pack with you. It also means that you can look forward to the ridgeline as the high point of your trip.
Our Jotunheimen trek
-
Jotunheimen Trekking – The Stages with Dates
Stage 1: Gjendebu – High valley beyond the top of the Rauddalsbande pass, 24.2 km, 820 vm↑/360 vm↓, 7 h
Stage 2: High valley beyond the top of the Rauddalsbande pass – Spiterstulen, 21.8 km, 230 vm↑/540 vm↓, 7 h
Stage 3: Spiterstulen – Galdhøpiggen – Spiterstulen, 12.4 km, 1380 vm↑/1380 vm↓, 7 h
Stage 4: Spiterstulen – Glittertind – Glitterheim, 15.8 km, 1350 vm↑/1070 vm↓, 8:15 h
Stage 5: Glitterheim – high valley below Besseggen ridge, 16.5 km, 440 vm↑/530 vm↓, 5:30 h
Stage 6: High valley below Besseggen ridge – Gjendesheim, 13.2 km, 790 vm↑/1090 vm↓, 6:20 h
Total: 104 km, 5010 vm↑/4970 vm↓, 41 h
Here you can find the tour at Komoot
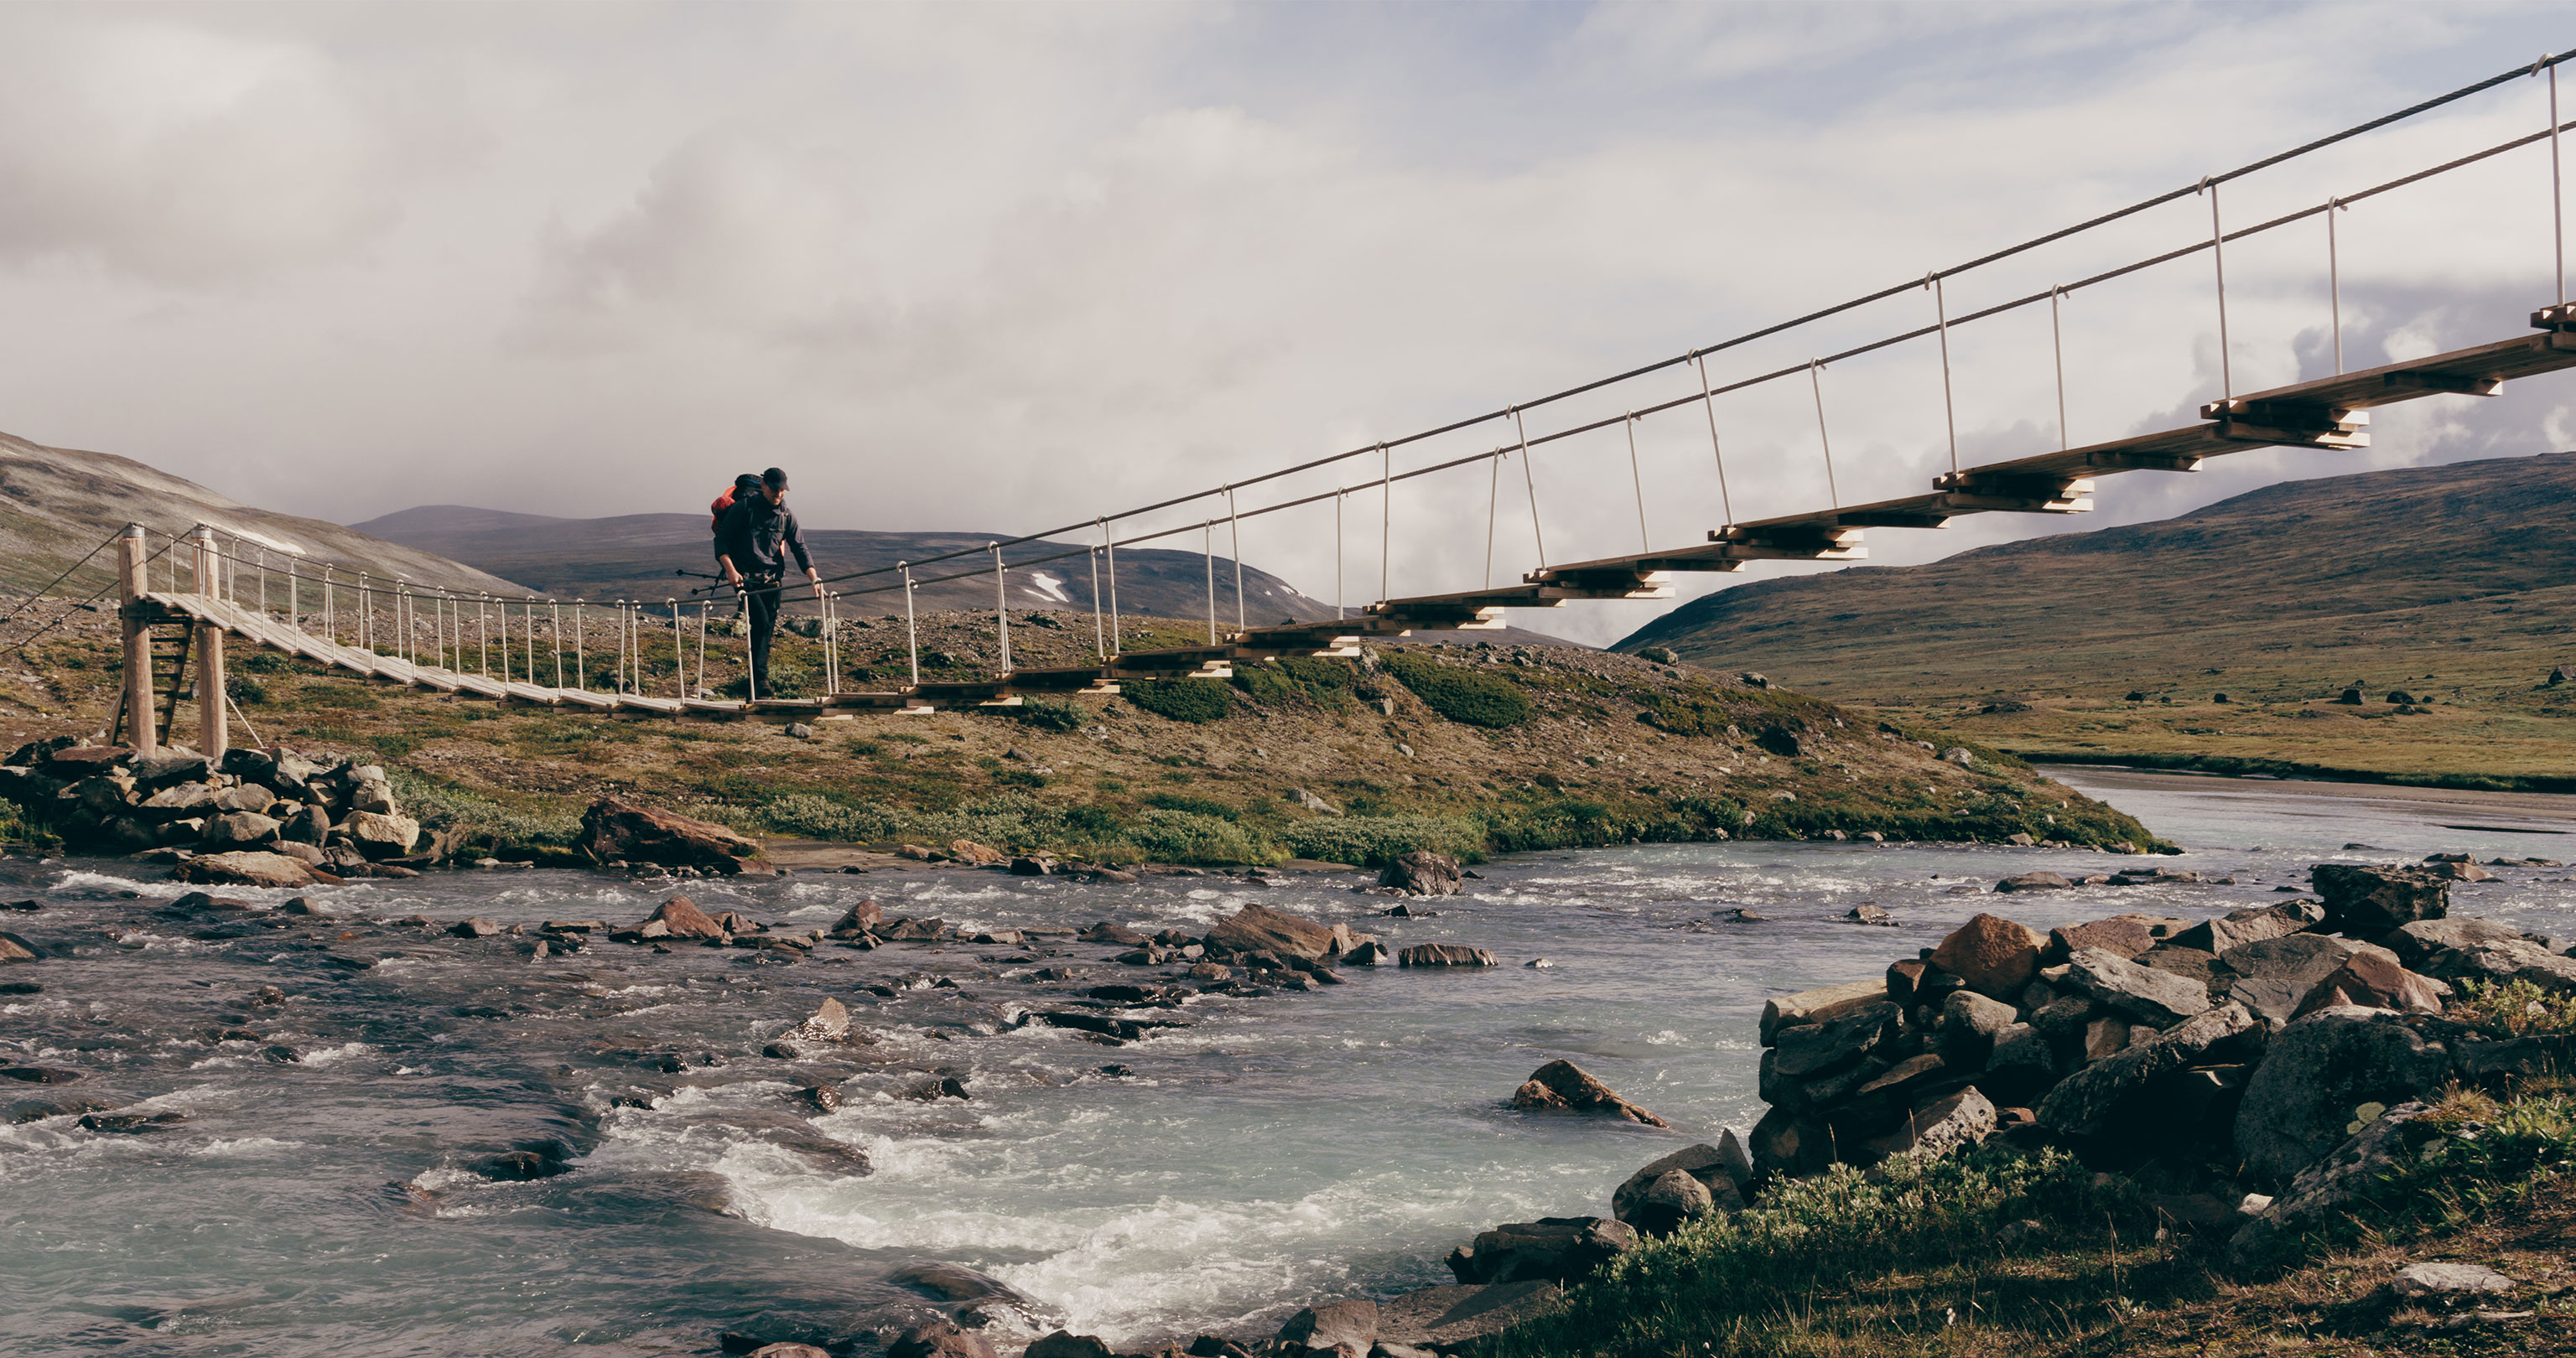
Jotunheimen Trekking Stage 1: From Gjendebu into the mountains
Travelling over the country roads, our journey there in our hire car from Oslo is an eye-opener in itself. For the first night, we pitch our tent by the river near the Gjendesheim hikers’ car park. We’re already getting that outdoor feeling, although we’ve not walked more than a couple of metres.
Because we’re saving the Besseggen Ridge for the finale, we first take the ferry to head as deep as possible into the Jotunheimen mountains. That way we have more time to see the interior of the national park. At 07.45, the first ferry leaves from the pier at the Norwegian Trekking Association (DNT) Gjendesheim mountain lodge. It takes about an hour to sail across the lake from east to west, before we reach the Gjendebu hut on the far shore.
We follow the marked trail into the Veslådalen, and plan to head on to Olavsbu and then find a place to camp near it. The sky is a steady grey, and huge clouds pass low over the mountains. It’s not really raining, there’s just a fine drizzle, but it’s not enough to prevent us from cooking our porridge outside in the open.
Soon, we leave the tree line behind us and move on into typically barren, high Scandinavian fell (fjell) landscape. The wide open expanse of stone, grass and snow has its own particular charm. Whenever we pause, we stop and stare at some landmark in the distance: a small group of hikers, a red tent on the horizon. When the wind drops, everything is still. This is exactly what we were hoping to find on our Norway trekking tour.
The trail leads on through Rauddalen. As the day progresses, the light remains unchanged. Several hours later we catch our first sight of the Olavsbu hut. The self-service cabin provides food and accommodation. However, we keep going and head north over a high pass (Rauddalsbandet) through snowfields. Upon reaching the high mountain valley on the other side, we have just enough time to pitch our tents before the rain starts lashing down. There’s no one else up here. We feel like intrepid explorers in a lonely, unknown continent.
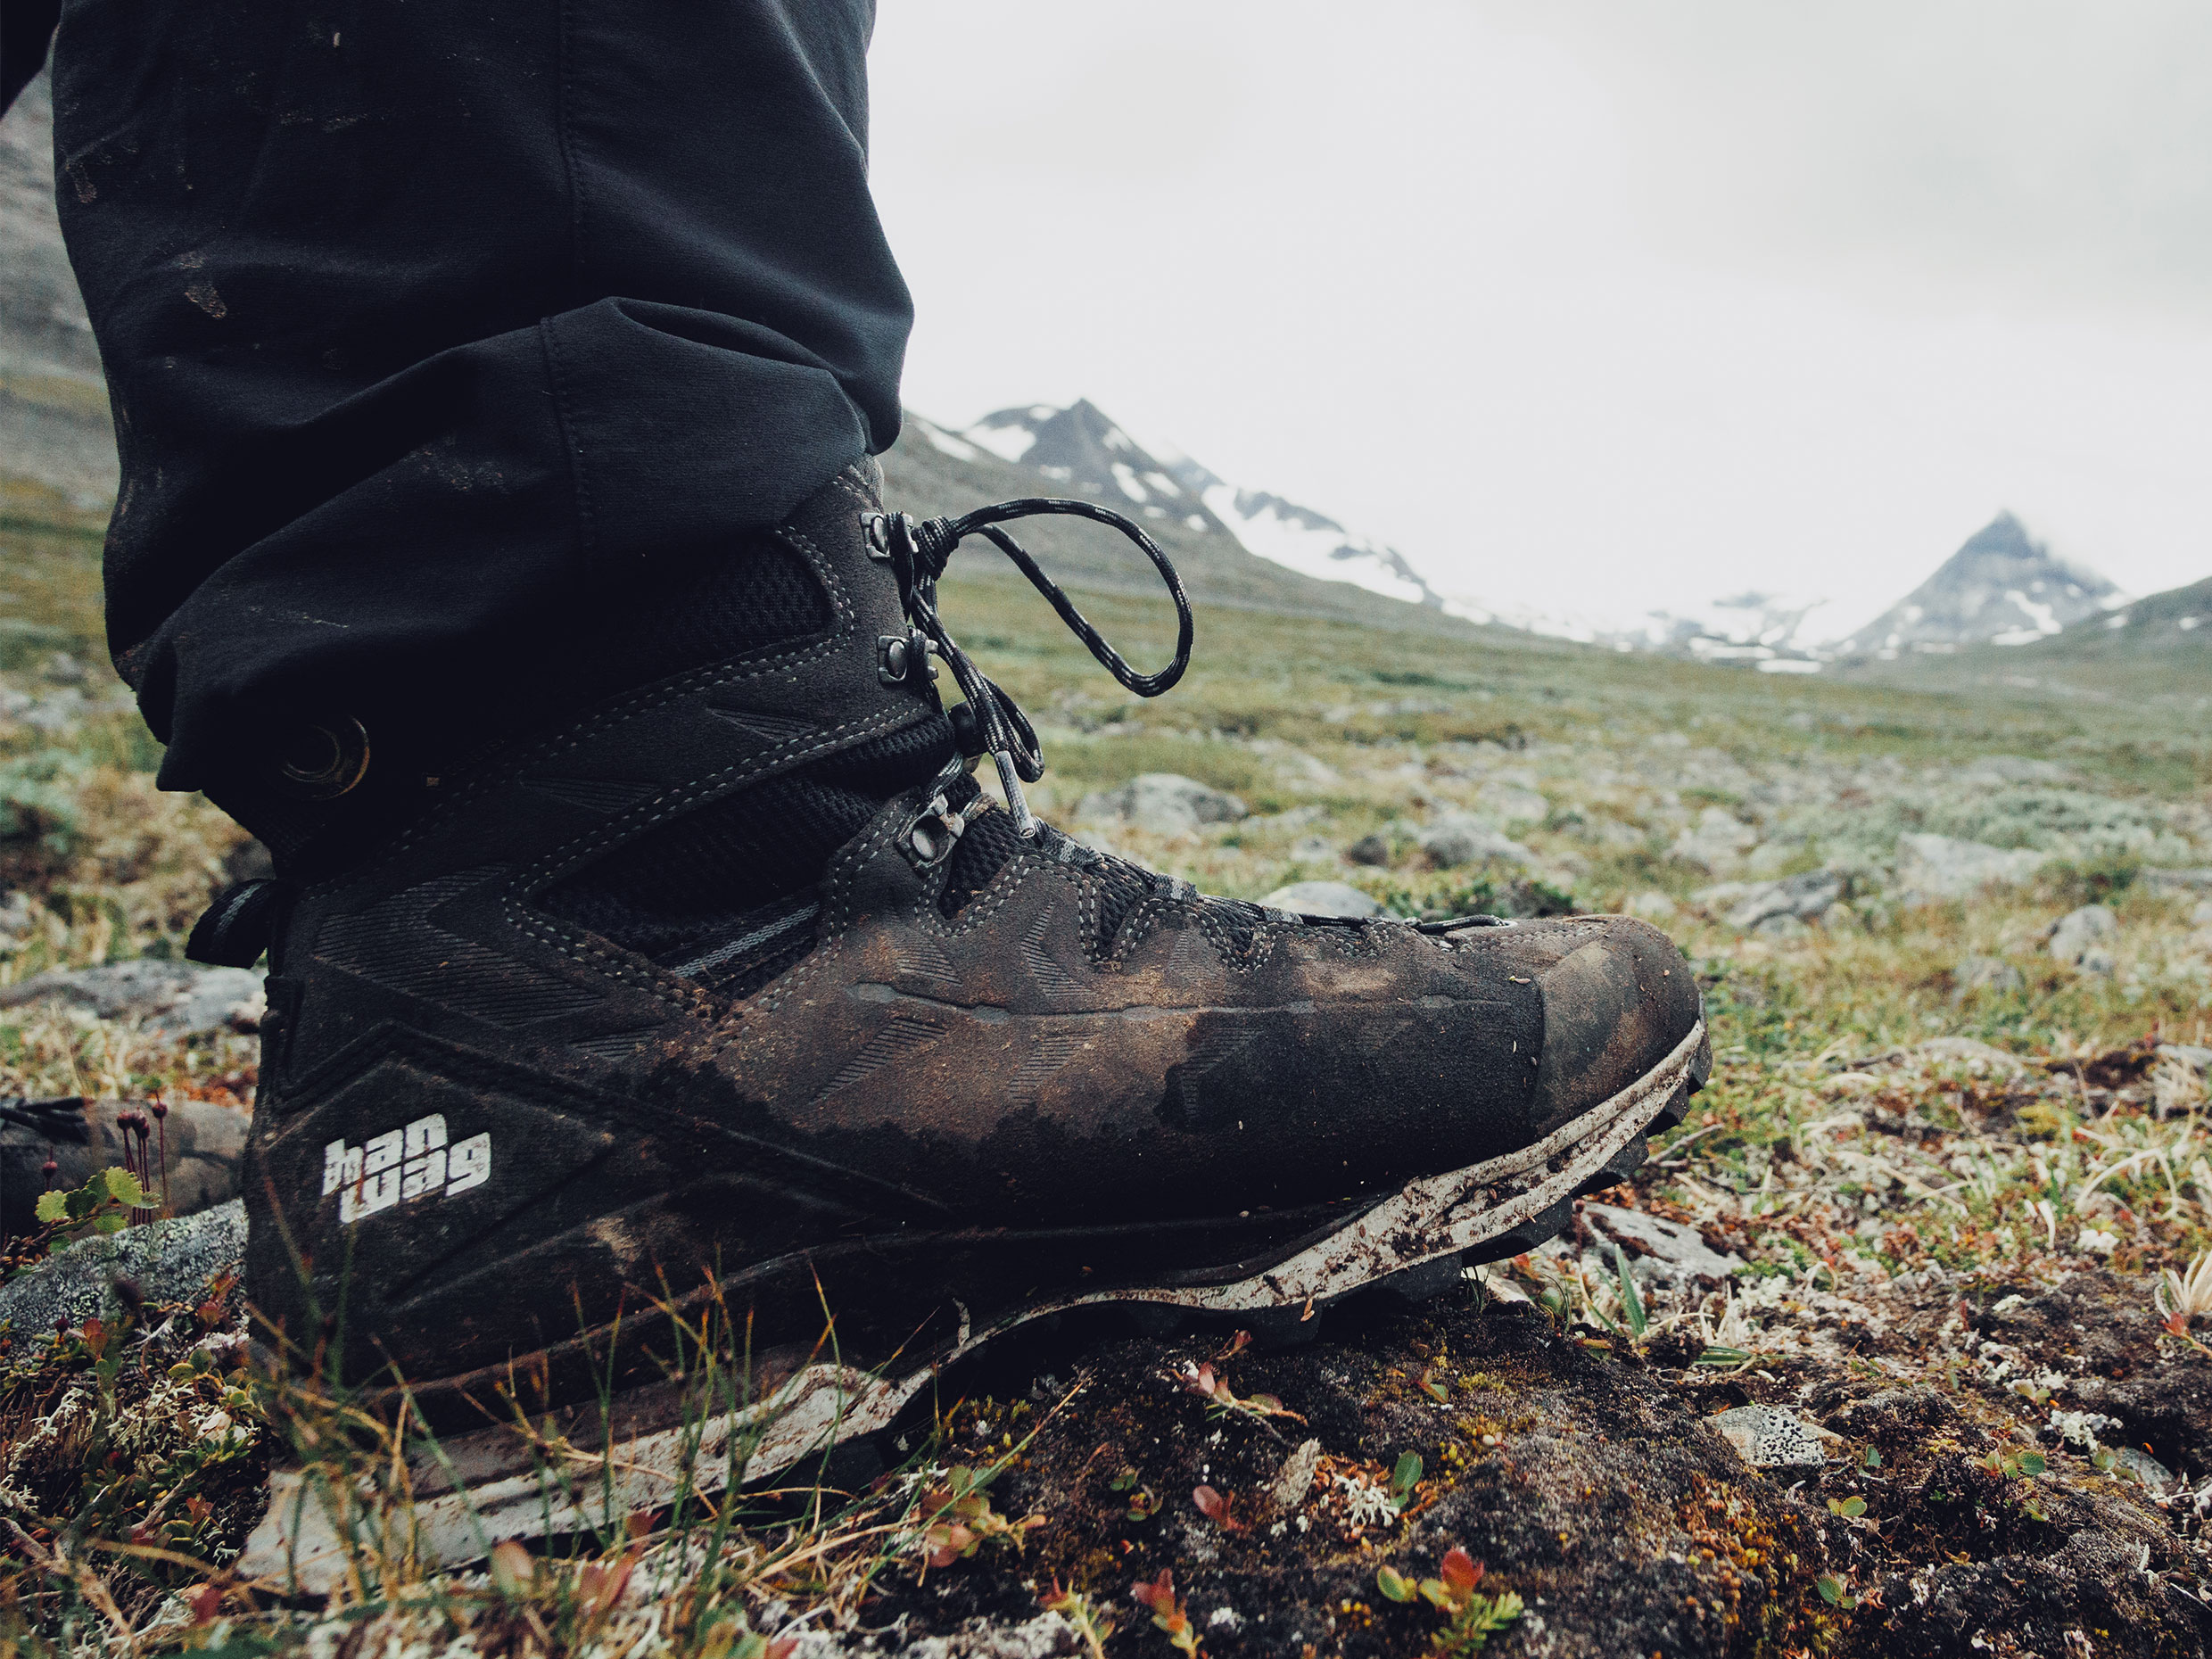
Our boot recommendation for trekking in Jotunheimen: HANWAG Makra Trek GTX
For his Jotunheimen hike Philipp wore the lightweight HANWAG Makra Trek GTX trekking boot. After six days of hiking in rugged terrain, Philipp said: “I got no blisters, despite not wearing the boot in before I went. That’s the way it should be.” Discover the HANWAG Makra Trek GTX in our webshop.

Stage 2: Heading for the Spiterstulen hut via Leirvassbu
Our next goal is Spiterstulen, the best place to ascend the Galdhøpiggen. We have over 20 kilometres to cover. However, distance isn’t everything. The ground under our feet is what makes the difference. The stonier the going gets, the slower we become. And slogging across the scree fields slows us down even further. In this kind of terrain, it’s good to have sturdy legs and solid, ankle-high, but lightweight hiking boots.
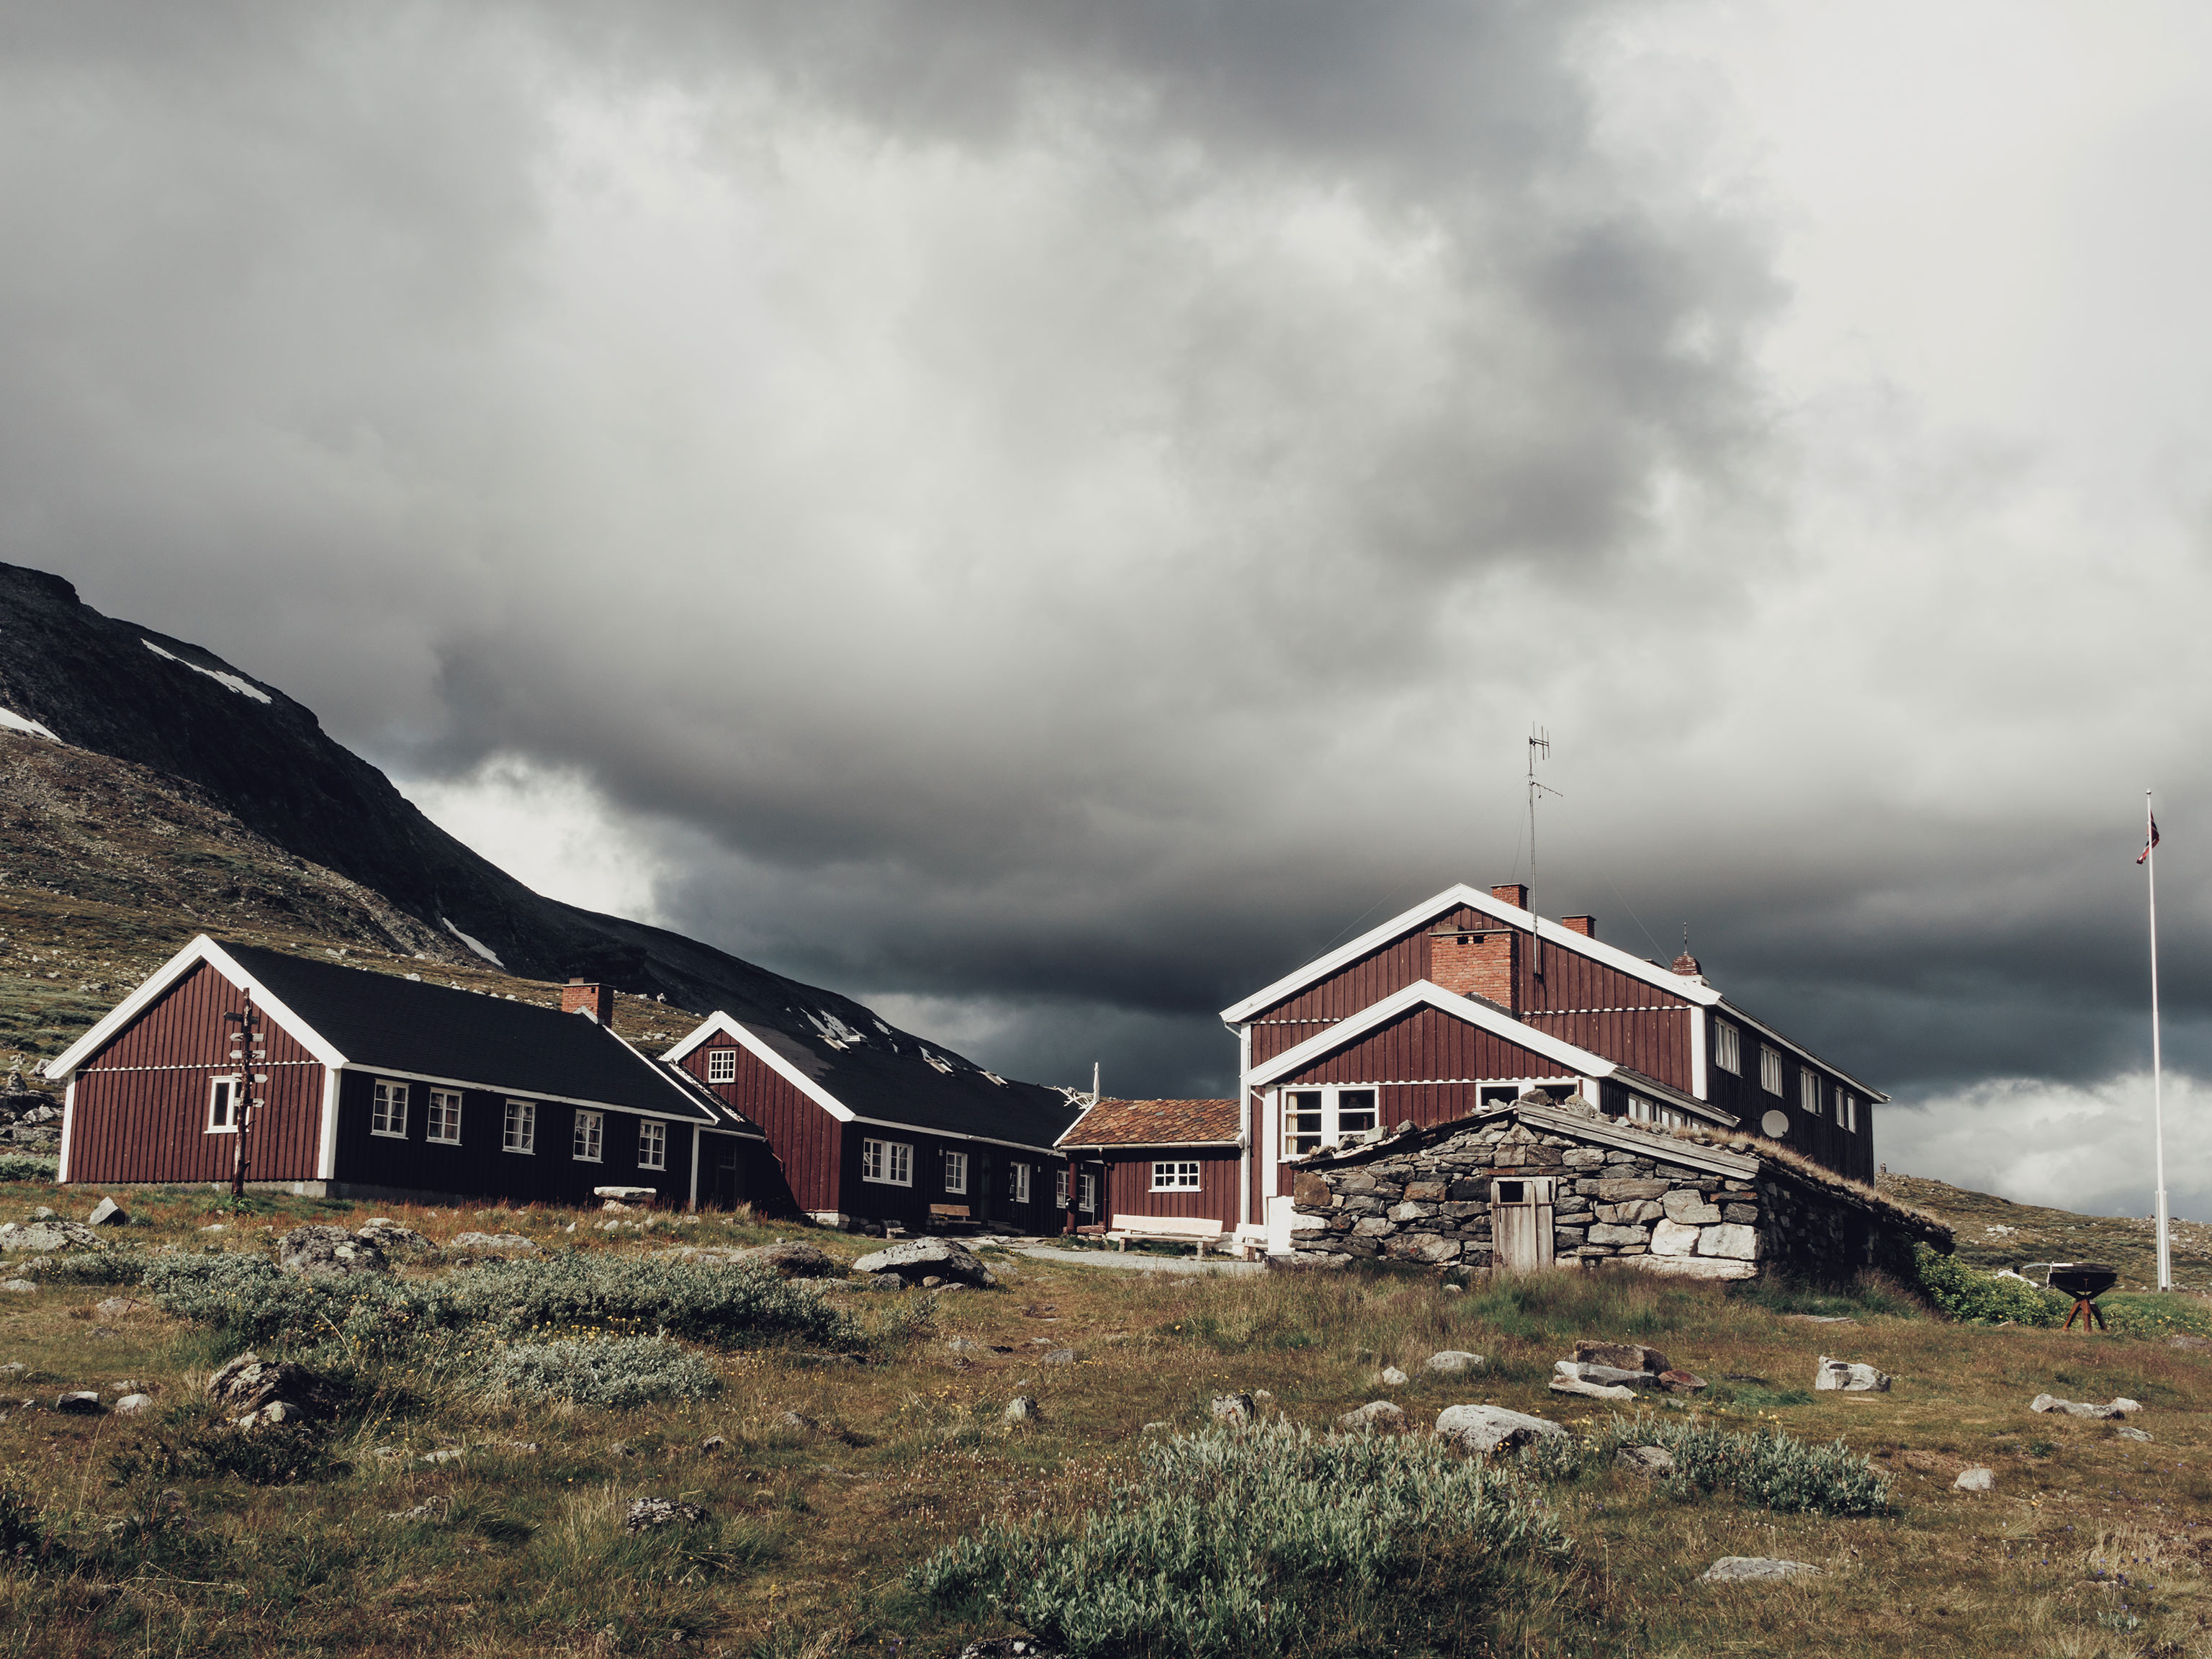
By late afternoon, we reach Leirvassbu, a comfortable hut. We decide to cook an early dinner over our gas stove.
The path on to the Spiterstulen hut is also hard going. We can’t help wondering if it’s always like this here? Or will the coming stages be any quicker? It doesn’t look like it.
Our mood changes as the clouds lift. We hike on in the afternoon sunshine into the idyllic Visdalen. The air feels warm, we follow the fast-moving river. It’s so hot, we fold up our shirt sleeves, our Jotunheimen hike is turning into a pleasurable stroll.
At the Spiterstulen huts, you’re allowed to camp on the other side of the river. It costs 110 kroner (ca. $10/£8) per night, which also gives you access to the wash block. If you want to wild camp, you have to remain at least one kilometres from the privately owned huts. There’s a cold wind blowing up the valley and we feel the warm common room beckoning – so we go for the on-site camping.
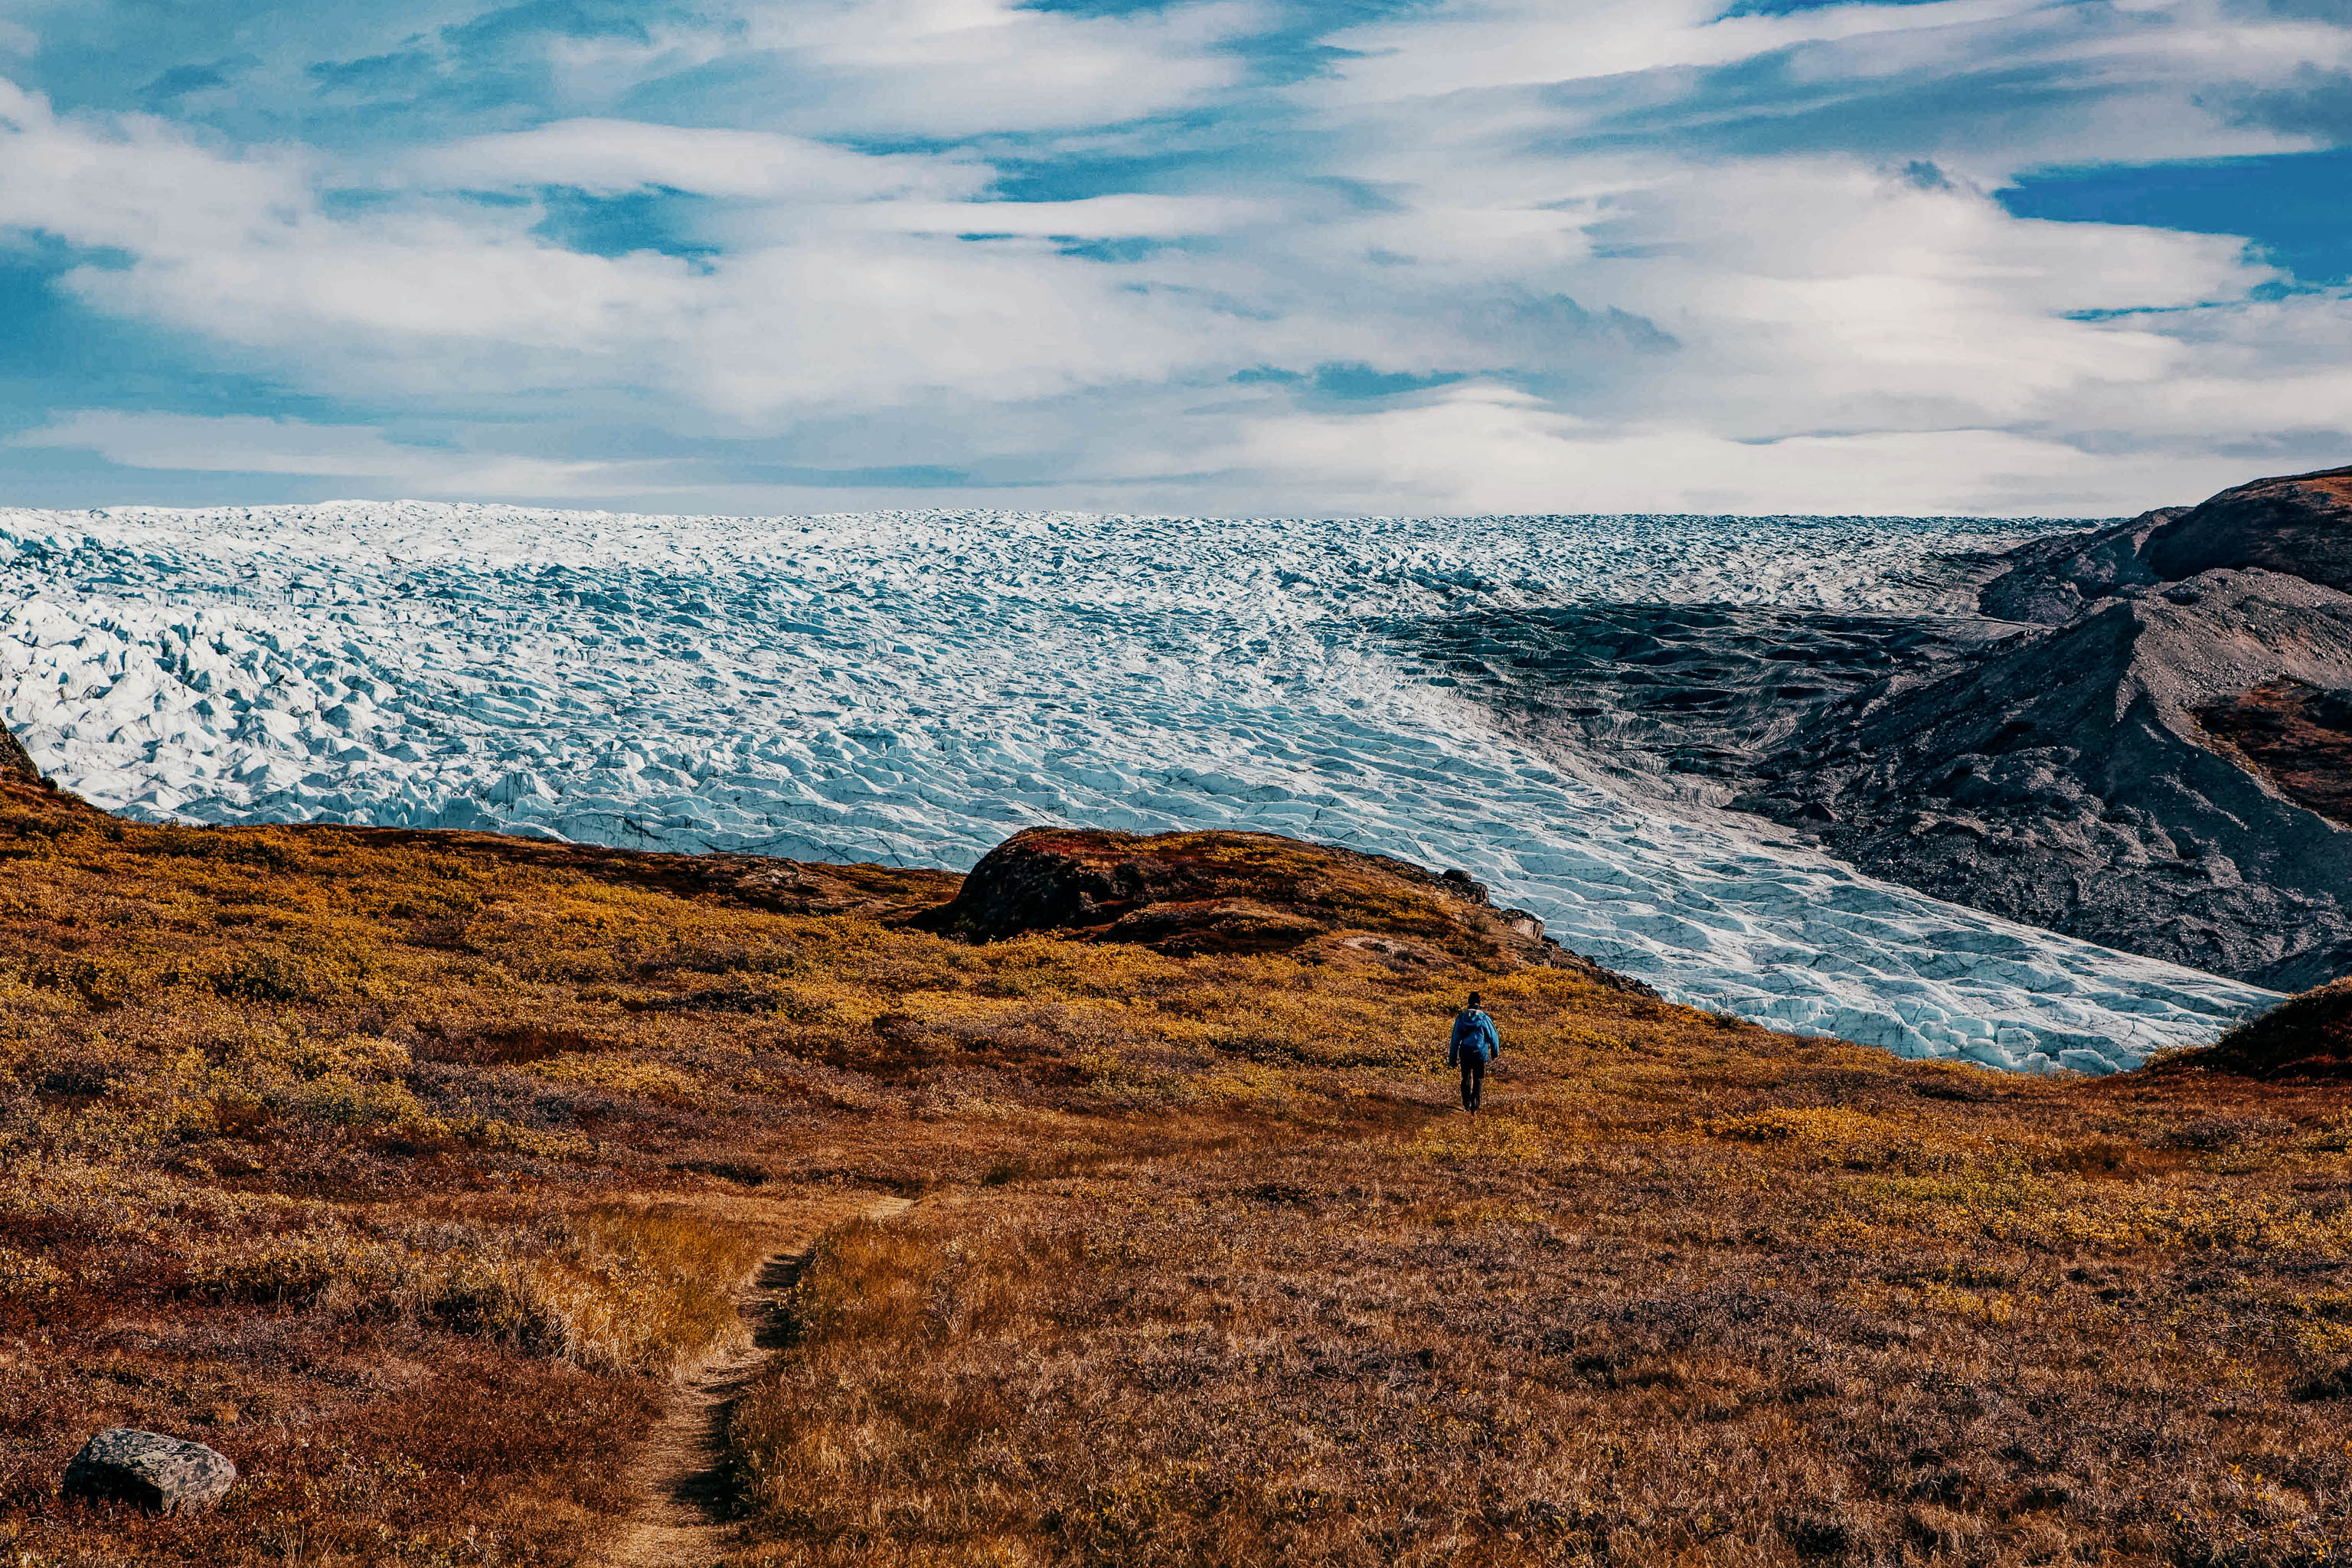
Stage 3: Winter conditions on Norway’s highest mountain
An ascent of the Galdhøpiggen is the first highlight of our trip – hiking in Norway doesn’t get any higher.
There are two designated routes to the 2,469-metre summit. If you follow the route from the Juvasshytta (Juvass Mountain Lodge) to the north, there is a glacier to cross, so you should be roped up (or book a guided tour with a mountain guide). The route from Spiterstulen follows a rocky ridgeline higher up and poses no danger from crevasses. We decide to take just a light daypack and leave most of the heavy gear in the tent. It makes a pleasant change.
The ascent first starts on a steep switchback trail with great views back down the mountain. At some point the trail runs out and only red-painted markings show the way. The mist descends, we have little vision. It starts to snow.
Before long it’s up to our knees. Moving over blocky terrain, we pick our way up the east ridge; there are two false summits before the real summit. To the right a steep, vertical cliff face drops away down to the glacier. Looking down though, all we see is the grey, swirling mist.
After three hours of hiking, we see a man walking towards us. He’s heading back. He’s turned around, because he’s lost the trail. We soon also find ourselves standing in a snowfield that seems to disappear into the mist. Heading across the slope, we head on upwards, until we discover a large, marked stone. We’re on the right track!
Reading tip: The child in you and the ‘home of the giants’
Suddenly, there’s the top. A small stone hut appears out of the mist. We knew that it was supposed to be here. But in this barren and hostile landscape, it feels almost unbelievable. The door opens into a warm, wood-panelled room with tables and a small kiosk where we’re greeted by a friendly Norwegian woman. She’s a mountain guide, but today she’s serving the guests. Unfortunately, there’s no power. So, no hot tea. Apart from that though, it’s nice to be here.
Apparently, bad weather does nothing to stop people hiking in the mountains in Norway. On the way back down, we constantly come across groups of hikers. Our encounter with two men in shorts (!) and a dog (!) quickly robs us of any illusion that we were on some kind of heroic polar expedition.
Stage 4: Climbing the Glittertind
This is where we head separate ways. I plan to head up and over the Glittertind (2,464 metres) on the way to the Glitterheim mountain lodge. My companion Jan decides to hike through the valley, which runs along the foot of Norway’s second highest mountain. This Jotunheimen trekking route is a good option if the weather and snow conditions are poor up on the mountain.
There’s no views for me today. But at least it’s not raining, or snowing. As I get nearer to the mountain, I spot some reindeer. Soon, I hit the marked path that heads straight up the steep slope. Carrying my 15-kilo pack, it’s hard going, my pulse is racing despite my slow pace. As I get higher up, the gradient eases off. I’m hiking in the mist through a barren rocky landscape. As I get closer to the summit, there is snow on the ground and the path is easy to find. However, proceed with caution! The trail runs close to the edge and there is a snow cornice here. Keep a safe distance from the edge!
At the summit, there’s no one here. But then a Norwegian couple turn up. They seem so relaxed and happy, as if they’d been used to these kinds of wild winter conditions since they were kids.
On the way back down, I can’t find the markings and lose my way. I meet a woman heading the other way. She explains that it’s possible to ignore the red markings and follow a direct line down over the large snowfield. Some people even toboggan their way back down. I decide to stick to the marked trail.
The path back down to Glitterheimen is pretty monotonous. Back down, I meet up with Jan, who is sitting drinking coffee in the warm DNT hut.
The same rule applies here: No wild camping in the vicinity of the hut. So we go for the official camping option (100 kroner per person per night, ca. (ca. $9/ £7). The benefits speak for themselves: beer and a warm room to sit in.
Stage 5: A refreshing dip
The second-from-last stage takes us from Glitterheimen to the Besseggen ridge. And it has everything you could wish for from a Scandinavian wilderness experience.
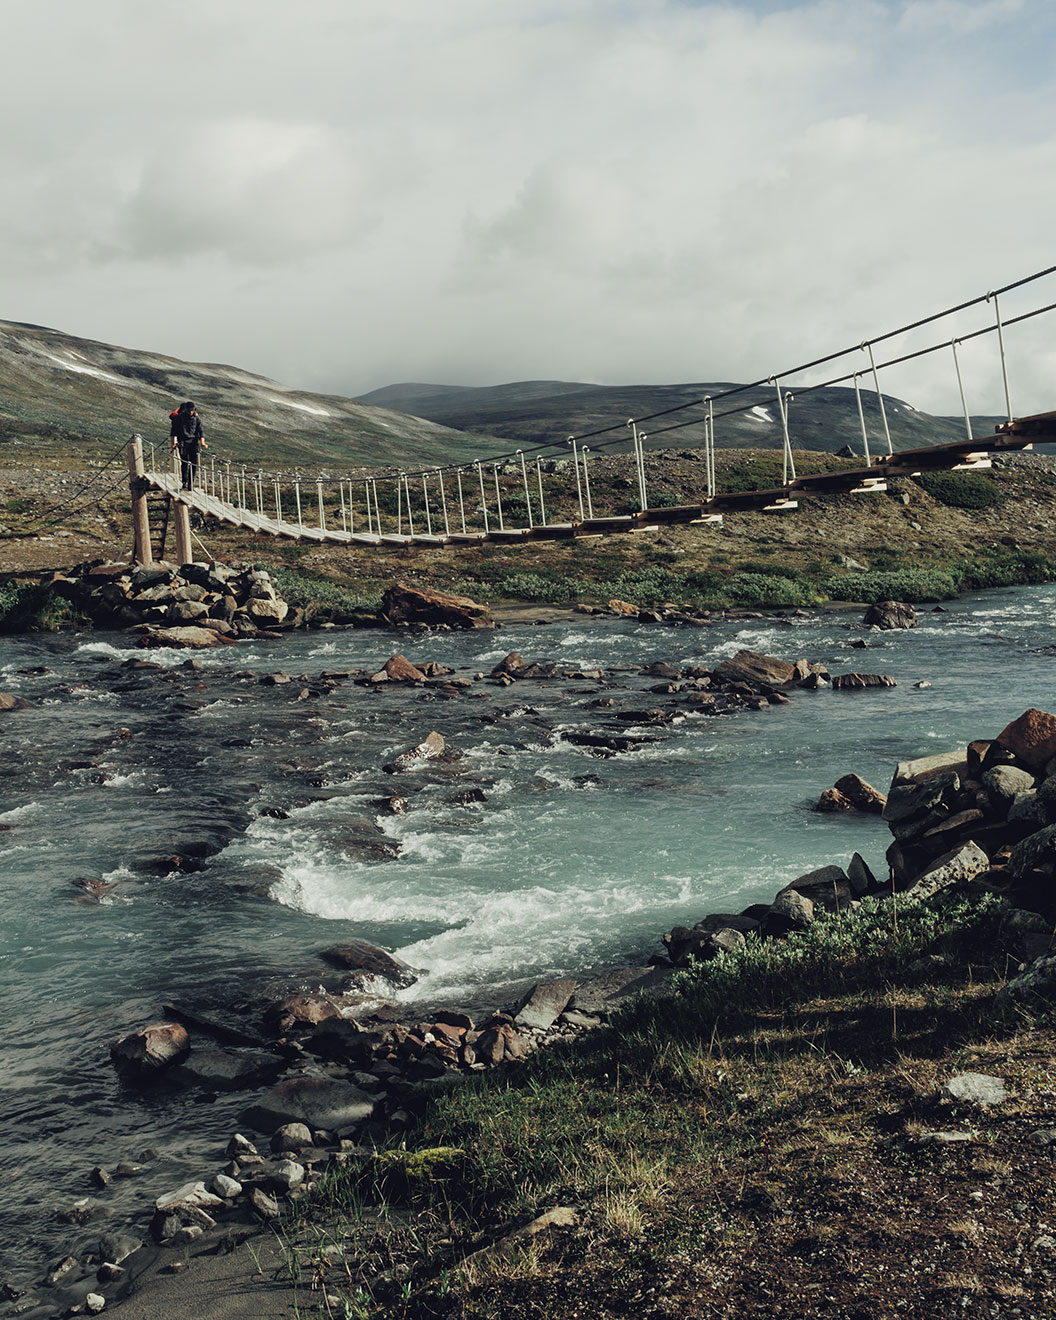
Early on, there’s a hanging bridge over a wild, romantic river. Then the trail steadily rises up until it reaches the entrance to the next valley. Once we’ve made our way through it, we stop for lunch next to a fast-flowing stream and gaze at the Russvatnet lake, with its beautiful jade and turquoise waters. Then we head down to the shore and along the side of the lake. Upon finding a flat, sandy bay, for some reason we decide to take a dip in the ice-cold water. Brrr! Refreshing!
After we’ve got some warm clothes back, we move on from the lake and hike to the top of the valley to find a place to pitch the tents. Leaving our backpacks at the foot of the hill, we head up the northern slopes of Besseggen to catch the evening light from higher up. Over the other side, we can see Memurubu down at Lake Gjende, where the day trippers start out from.
For a moment, we regret deciding to camp down in the small valley rather than up on the ridge itself. So we plan to be back up here before dawn the following morning. This turns out to be a wise decision.
Stage 6: The famous Besseggen ridge
Getting up early at 04:30 pays off. We’re back on the ridgeline before dawn – this time with our packs – and look forward to an amazing sunrise for our panoramic view over the mountains of Jotunheimen. There can be no better place for a morning coffee prepared on the stove.
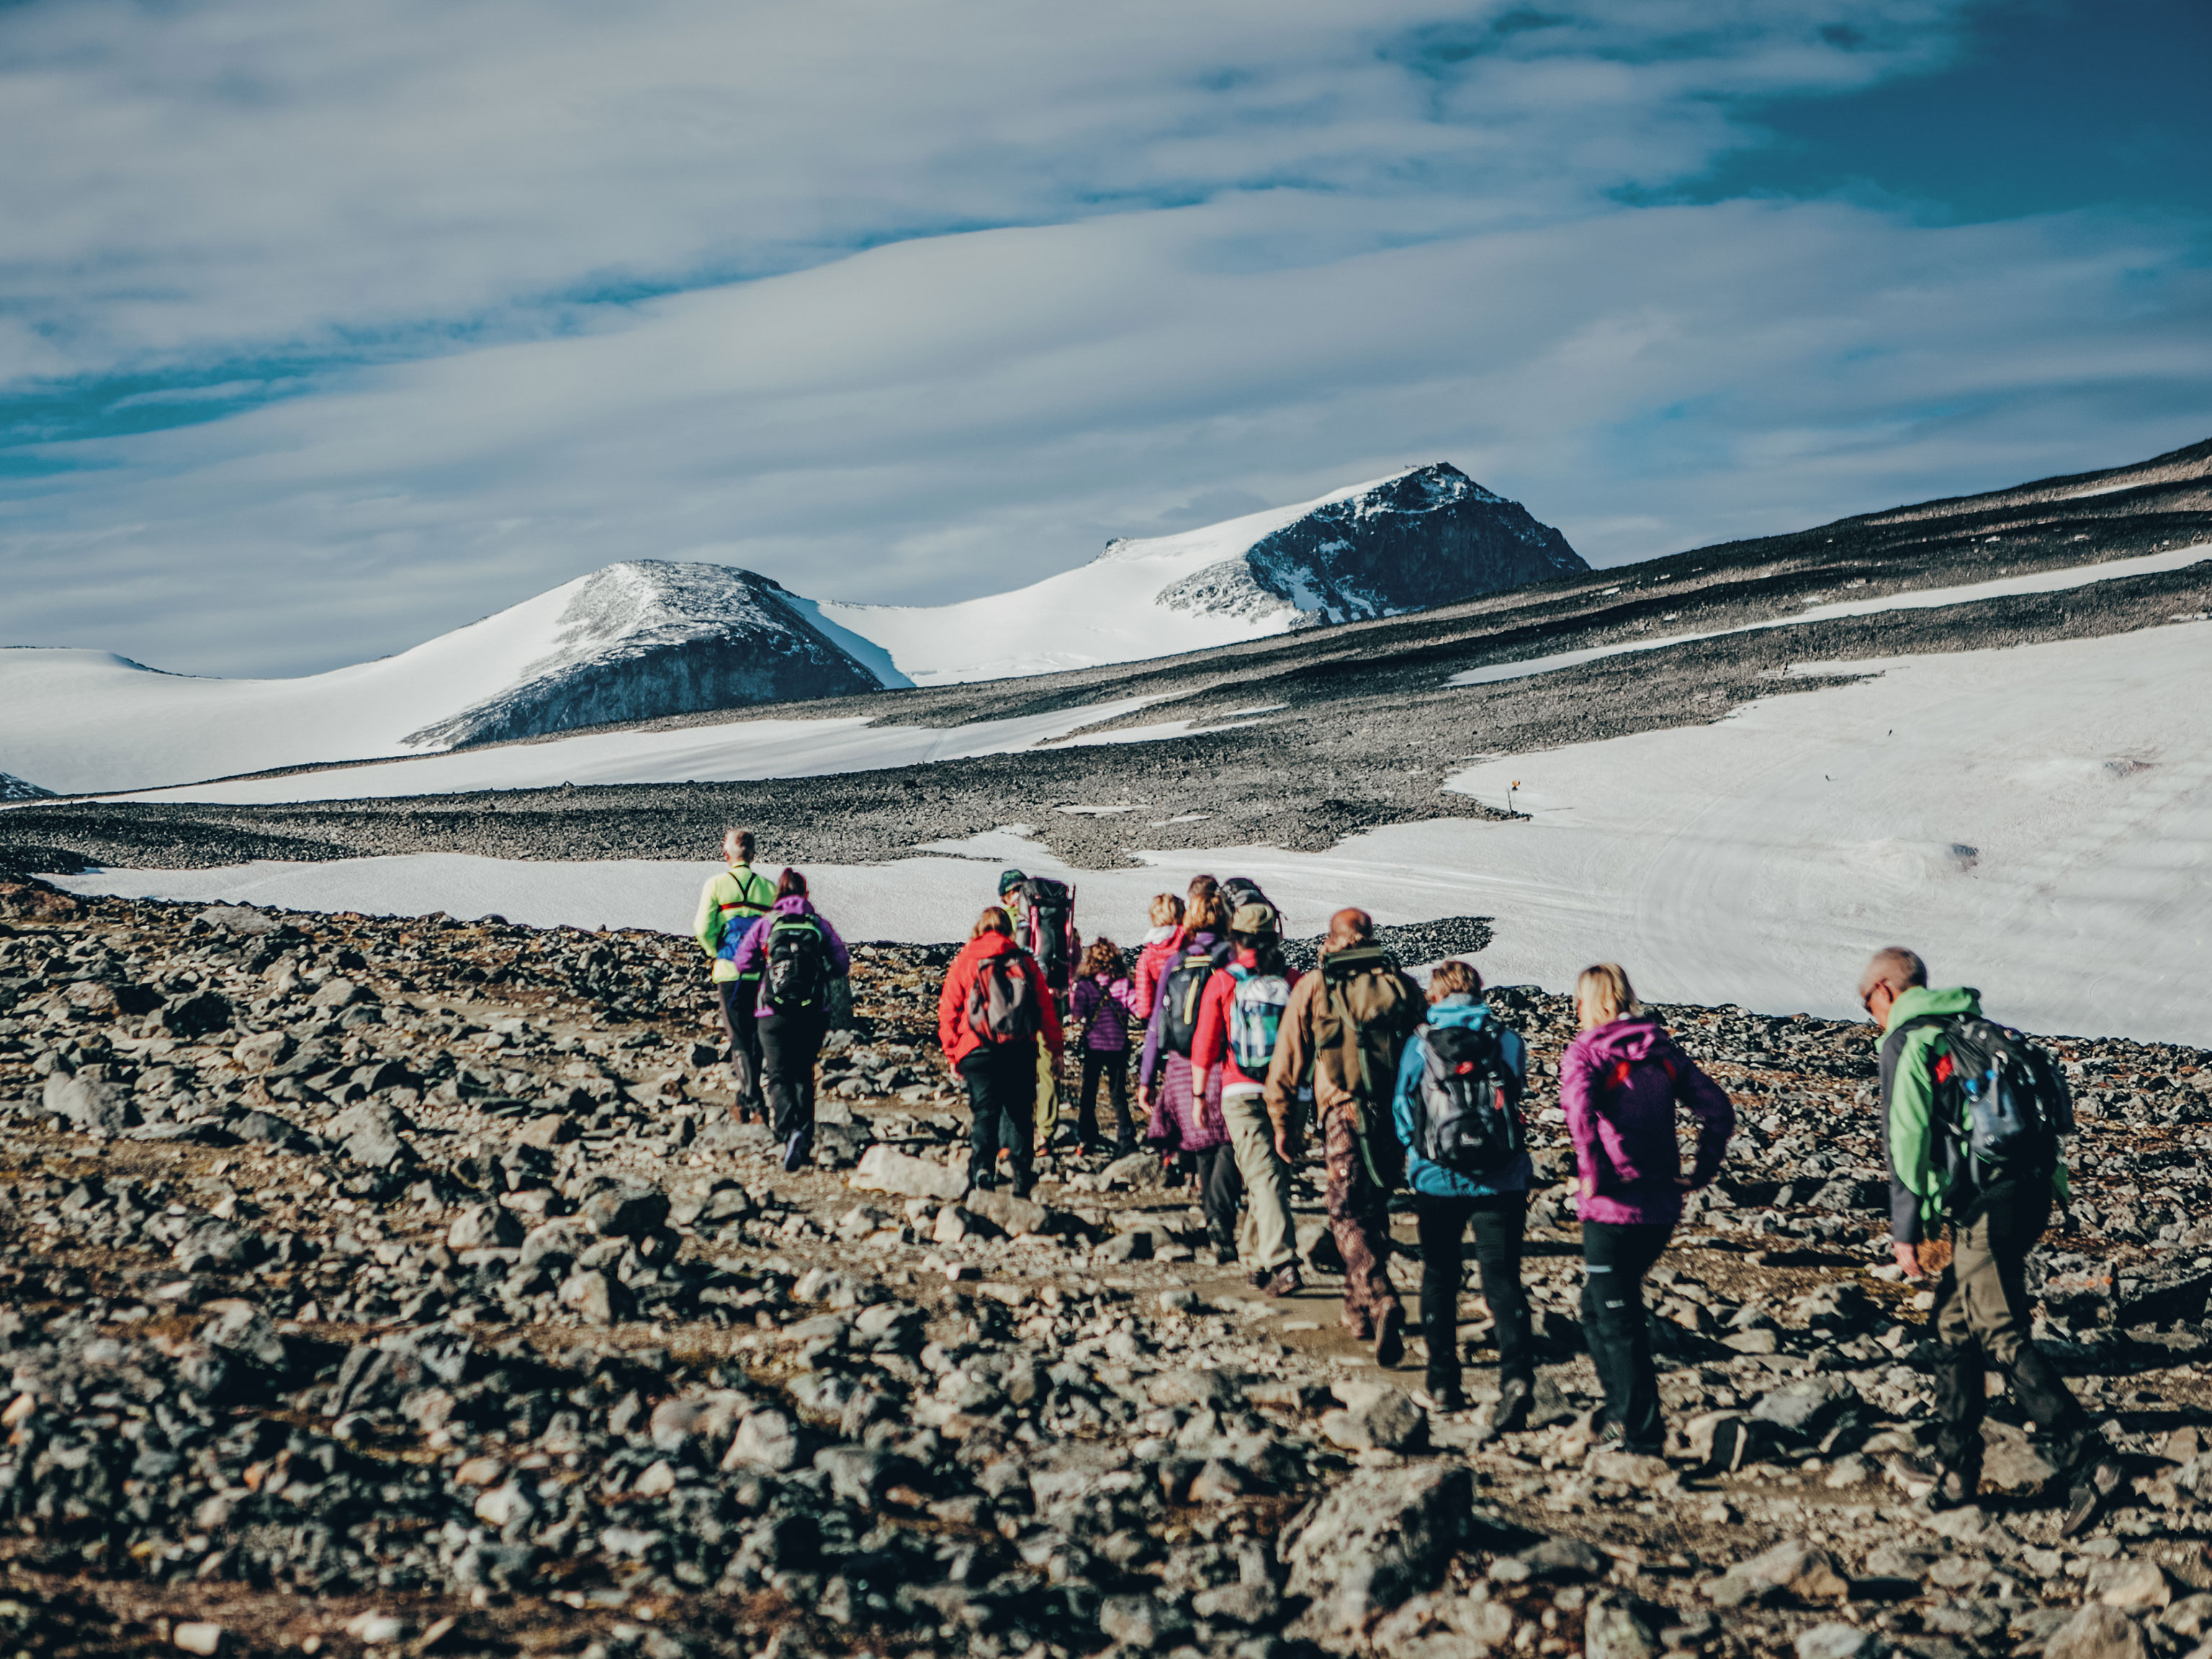
However, the friendly weather doesn’t look like it’s going to last for long. The skies close over and the clouds move in. We come across some information signs. They say that whoever has taken over a specified number of hours to get from Memurubu to this point should turn back. It would seem that many hikers underestimate the length of this popular trek.
As we move on, we pass a few small mountain lakes before the highlight of our tour really starts. On one side, you have the southern shoreline of Lake Bessvatnet, on the other, a cliff face drops hundreds of metres from the ridgeline down to Lake Gjende. You are literally walking on the edge (it pays to have a steady head for heights).
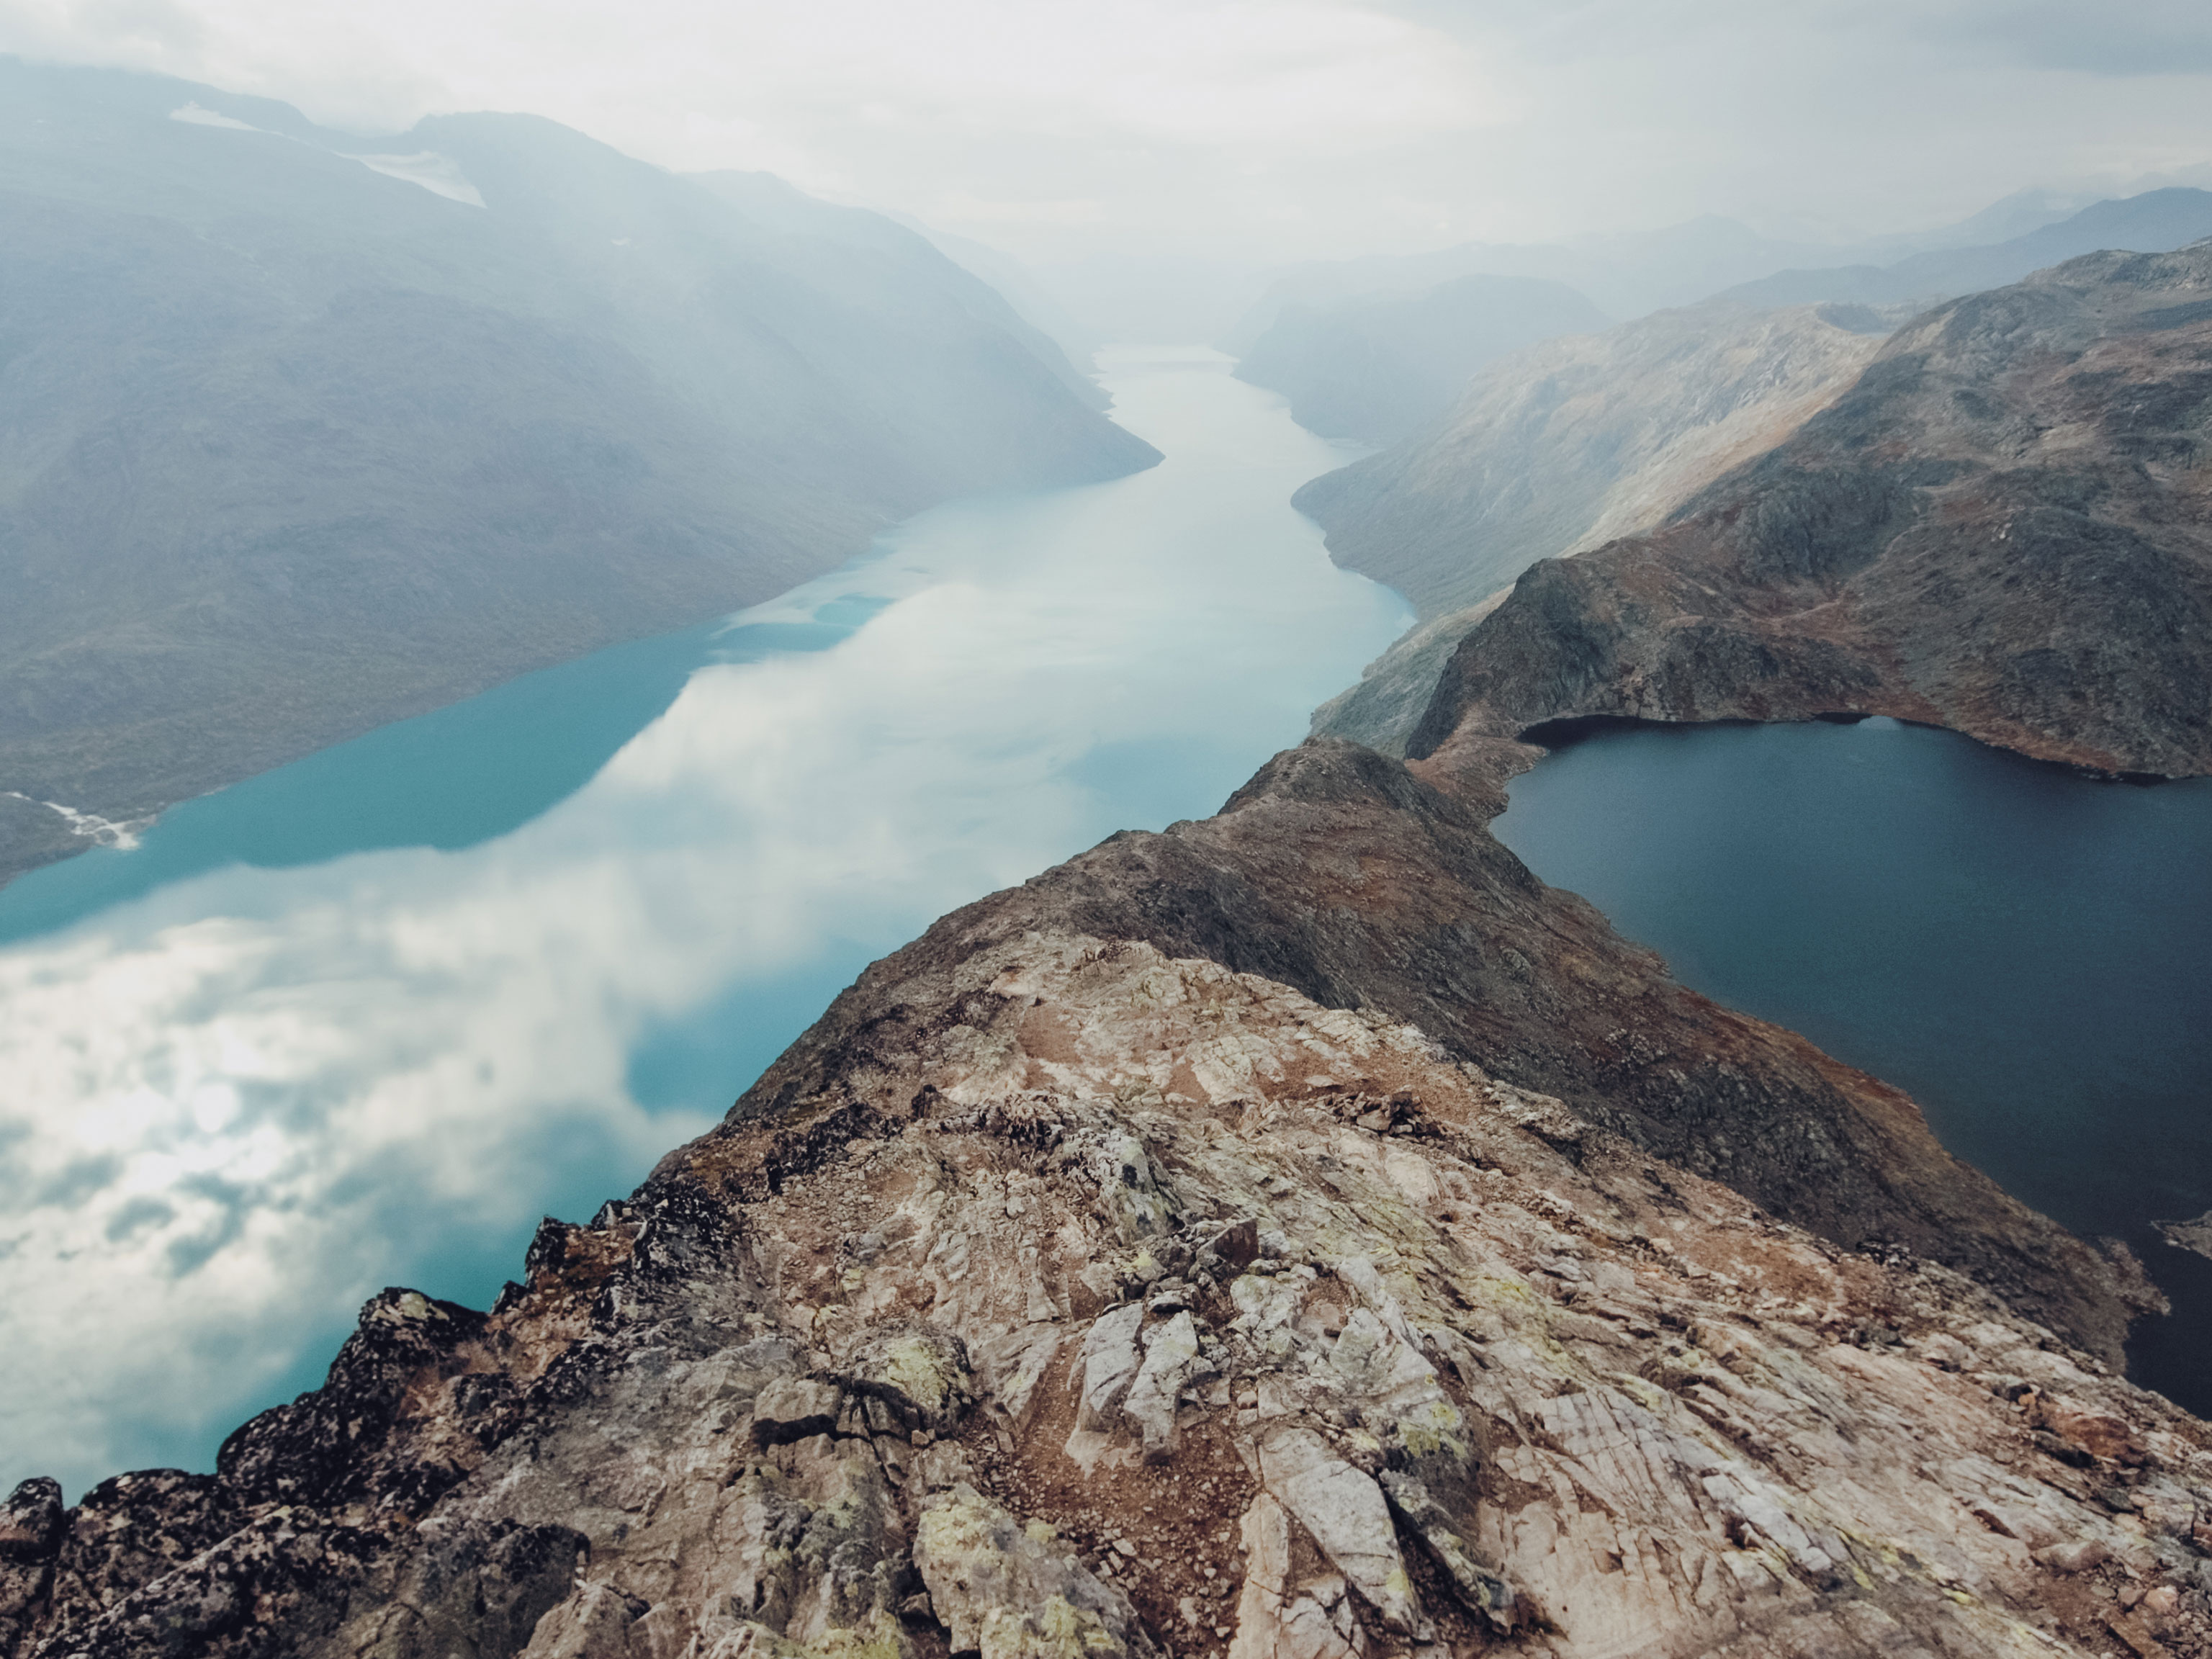
As the highpoint of our round trip, we hit the most technical and the most photogenic section of the route. The ridge leads up over easy, blocky scrambling to a rocky tower, with very exposed terrain in places. By now it’s started raining and the stones are getting wet underfoot. To be able to take in the view properly, we look for a safe place to stand.
Then we turn and look back – to Lake Gjende on the left and Lake Bessvatnet on the right, separated by the narrow, jagged Besseggen ridge in between them. There’s a 400 metre difference in altitude between the two lakes. Then the clouds close in and obscure the view. In two hours, we’re back at the car. We feel grateful that Jotunheimen has revealed so many of its amazing sides to us.